In WordPress, categories are a way to organize and group your posts into different topics or subjects. They help to create a structured hierarchy for your content, making it easier for visitors to navigate your website and find the information they’re interested in. Please take a moment to read our tutorial below on creating categories and subcategories in WordPress.
How categories work in WordPress?
- Organization: Categories provide a way to organize your posts based on common themes or subjects. For example, if you have a blog about food, you might have categories such as “Recipes,” “Restaurant Reviews,” “Cooking Tips,” etc.
- Hierarchical Structure: Categories can be hierarchical, meaning you can create parent categories and subcategories. This allows for a more detailed and organized structure. For instance, under the “Recipes” category, you might have subcategories like “Desserts,” “Main Courses,” and “Appetizers.”
- Navigation: Categories are often displayed in the navigation menu of your website, making it easy for visitors to browse through different topics. Visitors can click on a category to view all posts assigned to that category.
- SEO Benefits: Using categories can also improve the search engine optimization (SEO) of your website. By organizing your content into relevant categories, you make it easier for search engines to understand the structure of your site and index your content appropriately.
Overall, categories in WordPress serve as a fundamental tool for organizing and structuring your content, improving navigation for visitors, and enhancing the overall user experience of your website.
How to create categories in WordPress?
- Log in to Your WordPress Dashboard: Open your web browser and navigate to your WordPress website. Log in using your username and password to access the dashboard.
- Navigate to the Categories Page: Once logged in, look for the “Posts” tab on the left-hand side of the dashboard menu. Hover over it, and a submenu will appear. Click on “Categories” from the submenu.
- Add a New Category: On the Categories page, you’ll see a form to add a new category. Enter the name of your new category in the “Name” field. You can also optionally provide a slug, which is the URL-friendly version of the name.
- Assign a Parent Category (Optional): If you want to create a hierarchical structure for your categories, you can assign a parent category. This means your new category will be a sub-category of the one you choose. If not, you can leave this option blank.
- Write a Description (Optional): You can also write a description for your category. This description is optional but can help visitors understand what type of content they can expect in this category.
- Set a Display Type: You have the option to choose how your category will be displayed. WordPress offers different options like a default view, a category page with excerpts, etc. Select the one that suits your preference.
- Click on “Add New Category”: Once you’ve filled in the necessary information, click on the “Add New Category” button to create your new category.
- View Your New Category: Your new category should now appear in the list of categories on the Categories page. You can verify this by scrolling through the list or using the search function.
How to create subcategories in WordPress?
- Log in to Your WordPress Dashboard: Go to your WordPress website and log in using your username and password to access the dashboard.
- Navigate to the Categories Page: From the dashboard, find the “Posts” tab on the left-hand side menu. Hover over it, and then click on “Categories” from the submenu that appears.
- Choose a Parent Category: Before creating a subcategory, you need to decide which existing category will be its parent. If you haven’t created the parent category yet, follow the steps mentioned earlier to create one.
- Add a New Subcategory: On the Categories page, find the “Add New Category” section. In the “Name” field, enter the name of your subcategory.
- Assign a Parent Category: Below the “Name” field, you’ll see a dropdown menu labeled “Parent.” Select the parent category you identified earlier from this dropdown menu.
- Write a Description (Optional): Optionally, you can write a description for your subcategory to provide more context or information.
- Set Display Type (Optional): Similar to creating categories, you have the option to choose how your subcategory will be displayed. Select the appropriate display type.
- Click on “Add New Category”: Once you’ve filled in the necessary information, click on the “Add New Category” button to create your subcategory.
- View Your New Subcategory: Your new subcategory should now appear indented under its parent category in the list of categories on the Categories page.
Adding new category in WordPress
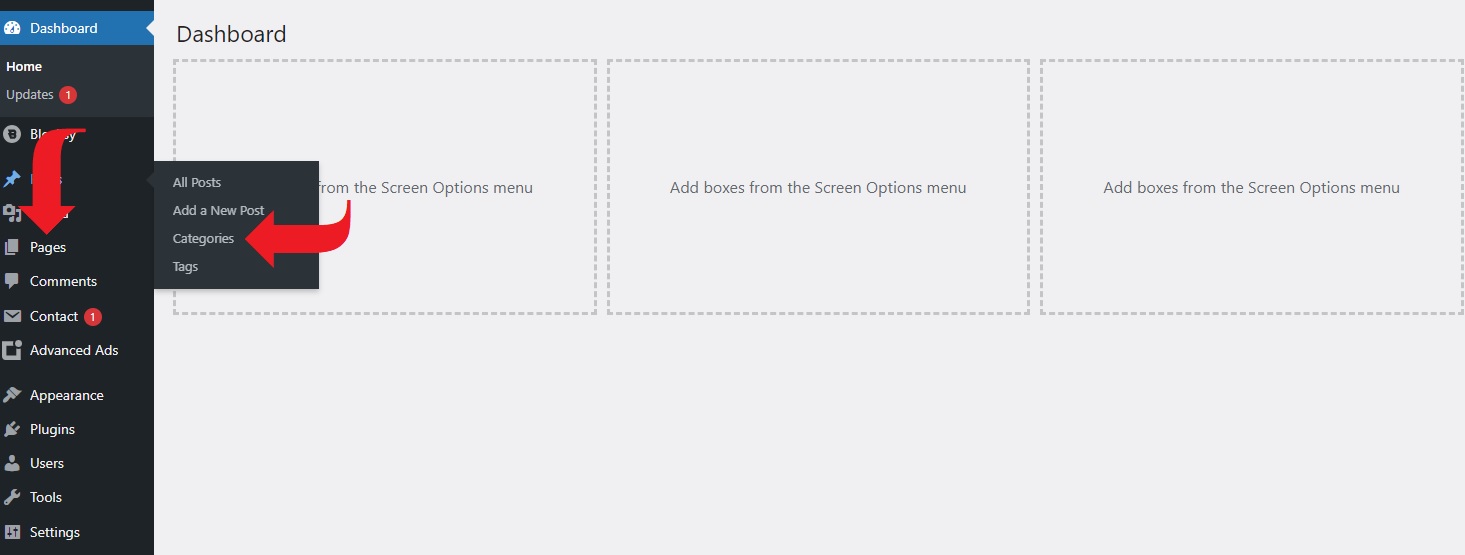
Image by: wordpresstrix.com